


10 DIY Home Decor Items you can Make from Things you Already Have
9 minuteRead
Owing to the coronavirus pandemic, most of us have spent more time at home than we would have ever thought of. However, the only upside of being holed up is that we get to try and experiment with so many different things. It’s the perfect time to put on your creative hat and tackle all those DIY home décor projects. It’s a universal fact that everybody loves decorating their homes with a hint of their personal touch. Whether it’s placing plants in a certain way or creating a cosy reading nook, we all envision a perfect home. However, getting experts to do it during such times can be a little dicey (social distancing). Also, hiring an interior designer can be expensive.
Well, making your lacklustre space look impressive isn’t an arduous task. If you have the time, energy, resources and inspiration to do it, you can create wonders. The best part? DIY home décor is all about using things you already have at home. This makes it extremely budget-friendly too.
Whether you’re looking to create decorative accents for your living room, bedroom, kitchen or patio, we have you covered with some artsy home décor ideas. You don’t need any serious crafting skills. From minor renovations to easy upgrades, we’ll show you how you can give your home a Pinterest-worthy touch without breaking the bank.
10 DIY Home Décor Crafts that will Instantly Refresh your Space
- DIY Vase
You’ll need:
- Glass milk bottles
- Borders and ribbons
- A pair of scissors
- Glue
There’s something about fresh flowers. They can genuinely boost your mood, reduce anxiety and make you feel relaxed. However, the best way to enhance the look of your flowers is by displaying them in a decorative container. If you’re bored of the boring glass vases and want to add some oomph to them, we have some DIY vase ideas.
If you’ve ever bought a milkshake, you know they come in those cute glass milk bottles, right? Instead of throwing them away, recycle them. Once you’ve collected at least three or four, start working around them. Look for leftover borders, ribbons and jute cords in your home. If the width of the border is large, you can wrap them on the centre of the bottle whereas if the width is lesser, consider tying it around the neck of the bottle. They look great and instantly give your bottle a new lease of life. Use it as a dining centrepiece or at the entrance of your home on the console table.
- DIY Plant Markers
You’ll need:
- Ice lolly sticks
- Glue
- Black marker
If you have a green thumb, you’re likely to understand how therapeutic gardening can be. Plants have almost become babies for new homeowners. Soaring the seeds, nurturing it and watching it grow can be extremely fulfilling. Whether you grow vegetables, herbs or flowers in your backyard, terrace garden or kitchen, this DIY activity can indeed make them stand out and give it a professional finish.
Grab some ice cream sticks, glue and a marker. Apply glue at the top of one stick and overlap it with another horizontally. It should resemble the letter ‘T’. Now on the horizontal stick which has been stuck, write the name of your plant/herb on it with a black marker. Make it as bold as possible. Once you’re done with all the markers, dig them inside the pot. To make these markers weatherproof, you can also coat them with varnish. However, this step is optional. It is definitely the cutest way to show off your plants to your guests.
- Decoupage
You’ll need:
- Thick paper – wallpaper, old magazines, paper napkins, origami papers, or special decoupage papers
- Decoupage glue/varnish
- A pair of scissors
- Soft cloth
- Sandpaper
- Cotton
Decoupage is an interesting way to give any old item a new lease of life. You can give an artsy finish to wooden boxes, trays, bottles, vases, coasters, frames or literally anything. If you’re a fan of vintage home décor, you’ll definitely find this craft form interesting. The steps are as follows:
- Once you’ve selected the item you want to decorate, make sure the surface is clean and smooth.
- Next, cut out the pictures you’d like to use on the item. Vintage florals look great on trays and coasters.
- Glue the pictures in place. It’s always better to do a mock on the tray before sticking them.
- Smooth out any wrinkles and wipe out excess glue.
- Once the glue is dry and the pictures have stuck to the item, start varnishing. Anything from four to ten coats may be needed until you’re happy with the finish. If there are any imperfections, you can use sandpaper to scrub them out.
Once you’re done, let it dry overnight and Voila!
- Wine Glass Decorating
You’ll need:
- Wine glasses
- Tea lights
- Artificial flowers or terrariums
We’re pretty sure most of you have umpteen number of wine glasses gracing your crockery cabinet. What if we said, you can actually put them to use? They are incredibly versatile décor pieces. So, for the time you’re not drinking wine, use them as decorative accents on your coffee table, buffet unit or anywhere else in the house. It’s not just super simple to create but also a great DIY Diwali décor idea. Place a flower/terrarium on the table and invert a wine glass onto it. On the base of the wine glass, place a wax or LED tea light. Voila! Your wine glass candle holder is ready. They’re the easiest way to add a warm glow to any corner or room.
- Cane Basket Wall Art
You’ll need:
- Round cane baskets in different sizes
- Oil paint
- Varnish
- Nails (hardware)
Gone are the days when baskets were used to store things in a home. Today, they’ve become works of art. If you have cane or wicker baskets lying in your home, put them to use. All the better if you have them in different shapes and sizes. You could keep them in their natural finish or paint them to add a hint of colour. It’s a fun way to create a Bohemian interior design. These woven baskets make for a great gallery wall right above your living room sofa. Once you have your baskets ready, arrange them in a cluster. You’ll find plenty of reference images online. Get a carpenter to fix them into the wall or you could also do it yourself. That’s it! You just created a fun DIY wall art that oozes with a tropical vibe. Put a plant next to it to enhance the mood.
- DIY Shoe Box Charging Station
You’ll need:
- One shoe box
- Scissors
- Duct tape
- Craft knife
- Glue
- Pens
- A power coupler
If you’re someone who loves a neat, tidy and clutter-free space, this DIY home décor idea is for you. Thanks to all our online orders, we all have a whole lot of cartons and shoe boxes lying in our homes. Instead of sending them in the trash, use them wisely. Believe it or not, you can actually create your own little charging station without all those messy wires and cables.
All you need to do is get the shoe box ready based on your taste. Based on the number of devices you want to charge, create those many holes. Ideally, three should be enough. Stick some decorative rings around the holes. Remember to make a hole at the back of the box too (for the power coupler). Once you’ve done this, throw in all your wires and pull them out from each hole. You could also label it. Cover it with the shoe box lid and you’re done. Place it on your study table for a neat look.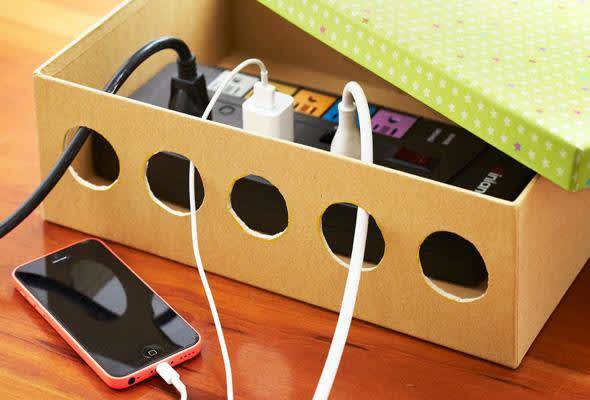
- Mason Jar Bathroom Dispensers
You’ll need:
- At least four mason jars or glass canisters with the lids
- Broad washi tape
- Glue
- Jute borders
- A pump from an old shampoo bottle
- A knife and wire cutters
In the quest of making the living room and bedroom look pretty, a lot of people miss out on their bathroom décor. Well, this room in your house needs the most attention. The best way to organise your bathroom essentials is by using mason jars. They’re so versatile. From flower vases to mixing bowls to dispensers, they can be used to their full potential.
Get three or four mason jars and use them to organise your bathroom essentials. Keep your toothbrush and toothpaste in one, cotton balls and earbuds in the other and use one as a soap dispenser. For that, all you need to do is make a hole in the lid of the jar so that you can insert your old pump into it. Fill it with a hand wash of your choice and you’re good to go. You can also decorate each jar with jute flowers, washi tape, broad borders or any other decoration. Place them on your bathroom counter to create a rustic yet vintage look.
- DIY Lampshade
You’ll need:
- A lamp shade (preferably white or any other pastel shade)
- String/twine
- Gold paint
A lamp can definitely change the mood of the room. It not just makes it appear bigger but also gives a warm, cosy feel. If you’ve already placed lamps in your bedroom or living room, and want to give them a more expensive look, you can easily achieve it in just a few steps. All you need is a roll of twine and gold paint. Make a ball of the twine and dip it in gold paint. Next, lightly give the lampshade impressions of the twine. Do it all over or in a pattern of your choice. Let it dry for a couple of hours and your lampshade is ready. The final product looks great and will definitely give your room a lift.
- DIY Liquor Bottle Lights
You’ll need:
- Empty liquor bottles
- LED fairy lights (battery operated)
Looking for fun and easy bar décor ideas? It doesn’t get better than this. The next time you finish your alcohol, don’t throw the bottles away. Instead, wash and dry them so that you can use them as lanterns. Creating liquor bottle lights is incredibly easy. Just take fairy lights of your choice and throw them inside the bottle. Voila! Your personalised liquor lights are ready. Try and use bottles of different shapes and sizes to add a dramatic look to your bar counter. Also, don’t peel the labels off.
- Dining Table Centrepiece
You’ll need:
- A long carton or wooden box
- Three mason jars
- Artificial plants
- White paint
- Varnish
Nothing looks better than a stunning planter centrepiece on your dining table. Why buy one when you can create one within a few minutes. If you have an old wooden box or carton, remove the top and paint it white. It should resemble a tray with a lot of depth. Give it a coat of varnish for a professional finish. Let it dry overnight. Next, clean and dry mason jars. You don’t need the lids. Put them in the box you’ve just created in a line and put plants/flowers of your choice in each of them. Place this on your dining table and watch how it instantly lifts the mood. You can even put water in the mason jars and add fresh flowers.
There’s something extremely therapeutic about DIY home décor. It’s not just a fun activity when you’re bored but also the best way to spruce up your home on a budget and with things you already have. In case you do try any of the above-mentioned DIY projects, do tag us on Instagram @girlsbuzzindia. We hope you enjoyed these décor ideas as much as we enjoyed sharing them with you.
Image Source: Pinterest
 natsi04
Natasha is a content writer, fashion enthusiast and connoisseur of food. Juggling between passion and profession, food and words are always on her mind. She believes in her dreams and herself. Reviewing restaurants and movies, and writing about trending topics excites her.
FOLLOW + MORE BY AUTHOR


Write, Record and Answer! Consume Unlimited Content! All you need to do is sign in and its absolutely free!
Continue with one click!!By signing up, you agree to our Terms and Conditions and Privacy Policy.